
I was so excited to make this cake, I have had the tin for probably about a year but have never been able to use it, so when the chance arose I jumped at it.
Our Uncle is not doing so well and we had family from all around come to Christchurch to visit him for a very special "High Tea". We used this High Tea to also celebrate both his Sister's and Mother's birthdays which are later on in this month, and this is where I come in. Cake Time!
I did some research on Pinterest and picked a few designs that I liked and of course threw most of them out the window, I decided to make Aunty Lyn a giant cup cake and Nana a Lace and Roses cake.
I had "pinned" a tutorial for a giant cupcake earlier using candy melts as the patty case, so onto The Cake Shop to get some candy melts and a few other bits and pieces. I had decided on Blue "patty case" and yellow buttercream for the icing.


How exciting this was going to be the first time using my new electric fondue set to melt the chocolate, much easier and quicker than on the stove top and no chance of burning like in the microwave, a crafty idea given to me by Morgan from The Cake Shop and it was great as it kept the chocolate melted while I took my time coating the pan. Not to mention so easy.


Our Uncle is not doing so well and we had family from all around come to Christchurch to visit him for a very special "High Tea". We used this High Tea to also celebrate both his Sister's and Mother's birthdays which are later on in this month, and this is where I come in. Cake Time!
I did some research on Pinterest and picked a few designs that I liked and of course threw most of them out the window, I decided to make Aunty Lyn a giant cup cake and Nana a Lace and Roses cake.
I had "pinned" a tutorial for a giant cupcake earlier using candy melts as the patty case, so onto The Cake Shop to get some candy melts and a few other bits and pieces. I had decided on Blue "patty case" and yellow buttercream for the icing.


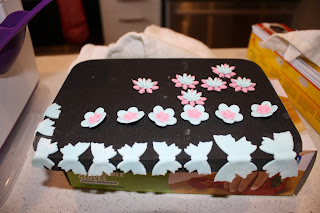
Being ever prepared I decided to make the butterflies and flowers the day before I needed assemble the cake. I coloured a small amount of fondant to match the blue candy melts, using my Wilton roller with the Pink rings I rolled it out and cut the butterflies, tip for any of you who can't work the plunger cutters first you need to cut, don't try to cut and press the plunger once you have cut the shape then press down the plunger to emboss the shape. Then bend them down the middle of the butterfly and leave over an edge, I used my Little Venice Company Flower Pad, and they will dry and set like this to give a 3D effect.


I also decided to make up some wee flowers, I coloured some fondant pink and cut out some flowers in one size and then using the left over blue fondant I used a smaller flower plunger so I now have 2 different sizes. Using a small ball tool and a flower sponge press lightly in the middle of the flowers so the petals roll up. Then I "glued" the smaller flower to the larger flower using a teeny, tiny amount of water and pressing down lightly again with the ball tool to secure. Then again I use a very small amount of water in the middle of the flower and placed a sugar pearl. I let them dry on the flower board as well.


So as with the tutorial I pinned on Pinterest I used a silicone pastry brush to coat the pan the first coat which wasn't pretty but the main goal is to get it into all the wee crevices and something you must remember is to use a paper towel and wipe the top edge clean.


Instructions on the pin said to put into "Icebox" for at least 30 mins, um Hello, What is a Icebox? a fridge a freezer? I don't know I googled but it came up some answers said fridge and some said freezer, for my trial I went with the freezer, I took it out for the second coat I used a spatula to make a thicker coat, then placed it in the freezer again for an hour. When I took it out of the mold I noticed the first coat had cracked, at first I assumed that it was because I hadn't let the first coat come up to room temperature after removing it from the freezer and before adding the second coat, so when I did the next one for the cake I had decided to let it come up to temp before adding the second coat, but when I took it out of the freezer I already noticed cracks so what I did was to chip it off, re melt it and this time I put it in the fridge and also let it come up to room temperature before adding the second coat and for me this was the successful run.


While it was setting in the fridge I made my cakes, I am pretty sure my tin is much smaller than other tins as I needed less than one lot of cake batter for each half. I used my Wilton Cake Release and had no problems getting the cake out. I actually did one half at a time because I could tell the top half would take less time to cook,
While the cakes were cooling I made up a double lot of buttercream icing and coloured it yellow, I knew I wouldn't need that much but I didn't want to risk having to try and and match the colours if I needed more than one lot.
Once I was ready to go with assembling the cake, I pulled the Chocolate "patty case" out of the fridge, but until then you need to keep it nice and cool in the fridge, I needed to slightly trim down your bottom half of the cake, I just sliced around basically just cutting off the patty case, leaving the cake smooth. Then I slotted it into the patty case. My cake was just shy of the top of the case which is what you want it means you can add a layer of buttercream which will "glue" the top half of the cake, just as you would if layering a standard cake.


Then after carefully placing the top half on, checking it was centered I did a very light crumb coating just on the top. Now it was ready for the buttercream roses, I had tried a couple of times to get the "rose" effect on cupcake before, I was told the best tip to use was the Wilton 1M so I had one of these on hand, but while researching for this cake I found lots of tutorials using the 2D tip, so I went out and got one of these and this was the tip I ended up using. I can't say I have completely mastered this technique but I will do some practice cupcakes which hubby can take to work. Once I find out what tip I prefer Ill let you know, it seems to be down to preference. I spaced out the roses and for any wee bits that are empty you just pipe a small amount of frosting.

Then I just randomly added the butterflies and flowers that I had made the day before. Constantly keeping in mind to edit and not "over" design something I learnt from my days fashion. I didn't end up using all the decorations I had made.

And here she is...

Wow! Looks amazing! I have no idea what a candy melt is but the result is awesome
ReplyDeleteColourd chocolate buttons easy to melt 😀
DeleteLoving it beautiful
ReplyDeleteThanks 😝
Delete