Tuesday 9 June 2015

Ombre Take One

I was dreaming about cakes last night a few different ideas but one in particular kept circling in my head a lavender Ombre cake. I had been wanting to try an Ombre cake for ages but never had an opportunity or an event to make one for so today when I woke up I thought sod it lack of event be dammed I'm going to make one anyway. I knew exactly what I wanted to do I wanted to use my Wilton Easy Layers tins so I could "Ombre" the layers as well and I wanted to try for the first time to make a Butter cream rose for the top. I was so excited I even put on an apron, normally I always forget till the first splatter of cake batter hits my clothes.


I got all my gear out, this was also an exciting time as it would be the first time I get to use my new mixer. So excited at first I forgot to take photos so they start late. But just like last time I made up the cake batter and then split into 5 different bowls and coloured. I used a plain Butter cake recipe but I probably should have used a Vanilla cake so the colour would have taken better as the Butter cake is slightly yellow. never mind though as I still think they came out well and you can tell it's lavender.

Here they are after their 20 minutes in the oven. I am not quite sure why they get the slight browning on the top it happened last time as well but when you cut into the cake you don't see any of this so I'm not terribly concerned about this. 


While they were cooling I made up the the icing. I made up one lot of butter cream for the crumb coating and to stack the layers. I made it up as I normally do then I added in my Whitener. Not to make it completely white but just to take away the cream tinge. I had a small about left over which I added more whitener to as I wanted to use this for the top of the cake.


Then onto my Lavender colours for this butter cream I completely made it white because I didn't want a funky purple for the icing. So for the incing rather than splitting into different I kept it in the same bowl and slowly added in the violet colouring. When I got the colour I wanted I took some out and filled up an icing bag then added a wee bit more colouring, and so on and so forth. I had planned on having just 3 different shades of the lavender, however after I filled bag 2 and 3 I decided that there wasn't enough variation between so I made a 4th before I filled up the Piping bag I added some more icing sugar to thicken and stiffen as I planned on using this colour for my Roses for the top.


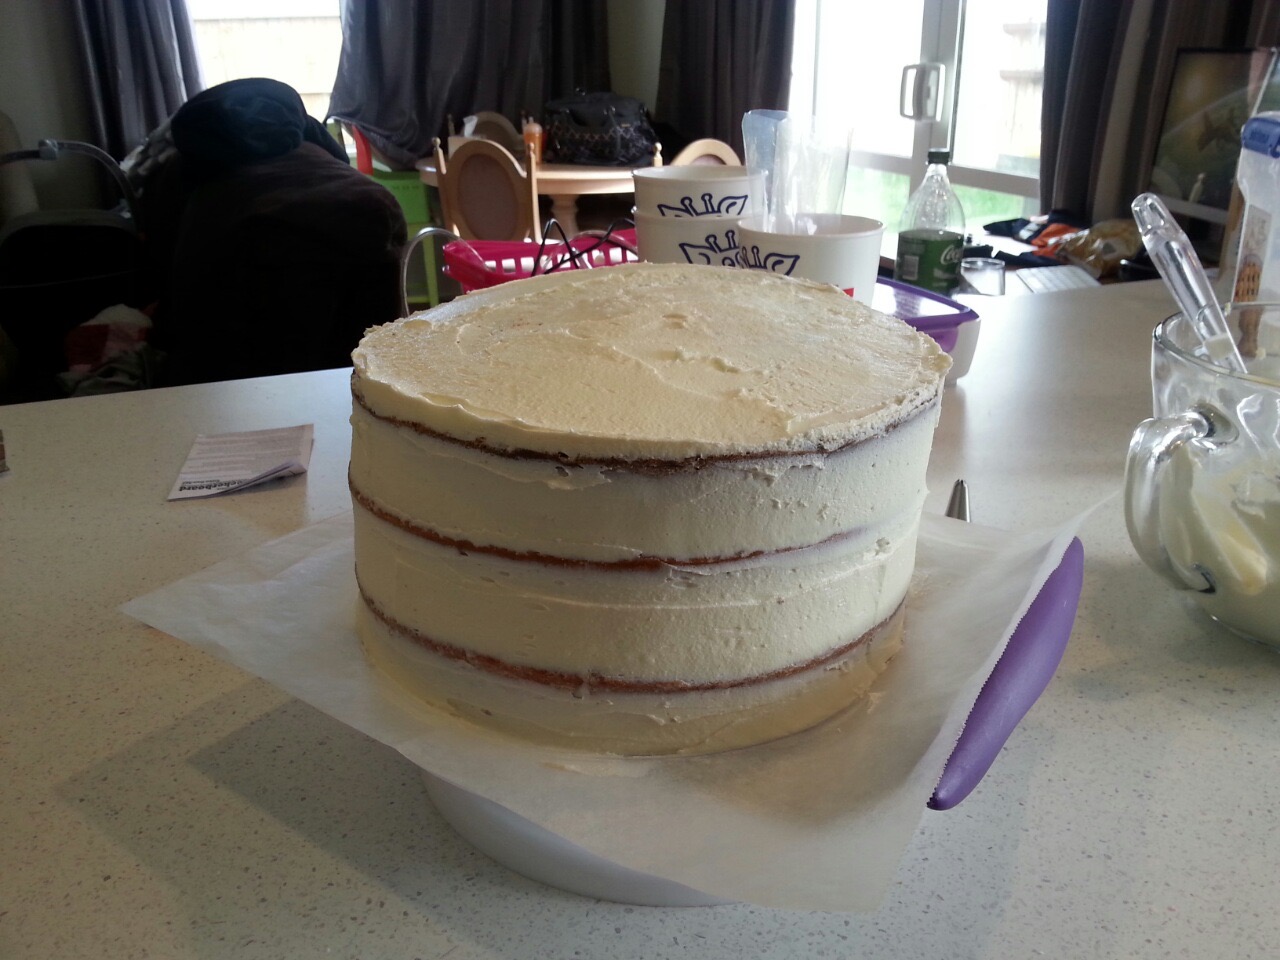
Now that the cake had cooled I set up for stacking and crumb coating.


I filled up the piping bag with the about a third of the icing with the Wilton M1 star tip for piping my "Dams"


Firstly I put a dab of icing to set the first layer.


After piping the "Dam" I then dump a wee bit of icing onto to spread out with the spatula. Then onto the next layer. Luckily while they were cooking and after they had cooked I had kept them all in order so I would know which way round to stack them, especially because I only have 1 oven rack so I needed to cook them in 2 batches.


I kept up until all layers were stacked. This time around I wanted to try a trick I saw on Facebook on a Wilton video of a new way to do crumb coating. Now I didn't have this specific sized tip but I did have a smaller one so I gave it a try. I did not find it easier at all, however I will delay my decision until I get the correct sized tip and try it again, because I can understand the idea behind it.


Then a big dollop of buttercream on top and spatula away. A little trick I use is to fill a large cup with hot water and keep dipping my spatula in to heat it, but always make sure that you wipe dry with a paper towel.


Something I noticed (After I had completed cake) the first time I used the Easy Layers tins is that even as careful as you are while stacking the layers when you crumb coat you really have to watch that you are not creating the Leaning Tower of Piza, kept checking that you are straight I had to adjust a few times, but once the crumb coating is set it's too late to adjust. once realigned it was off to the fridge.

Now it's time to try making the butter cream roses. While the cakes were cooking I had a wee look on Youtube and found a tutorial here and I watched it while the second batch of cakes were cooking. I was pleasantly surprised that it didn't seem to be too difficult and was excited to give it ago. So while the crumb coating was setting I got my piping bag that I had set up earlier I used my Quick Twist Coupler so I could change tips. I used Wilton 104 to make the rose. I was over all I was pleased with how they turned out, but I do think that the consistency wasn't quite right probably needed to be stiffer and I think that is why the edges of the petals are fluted but hey it all adds to the effect, perhaps I have created a new kind of rose.


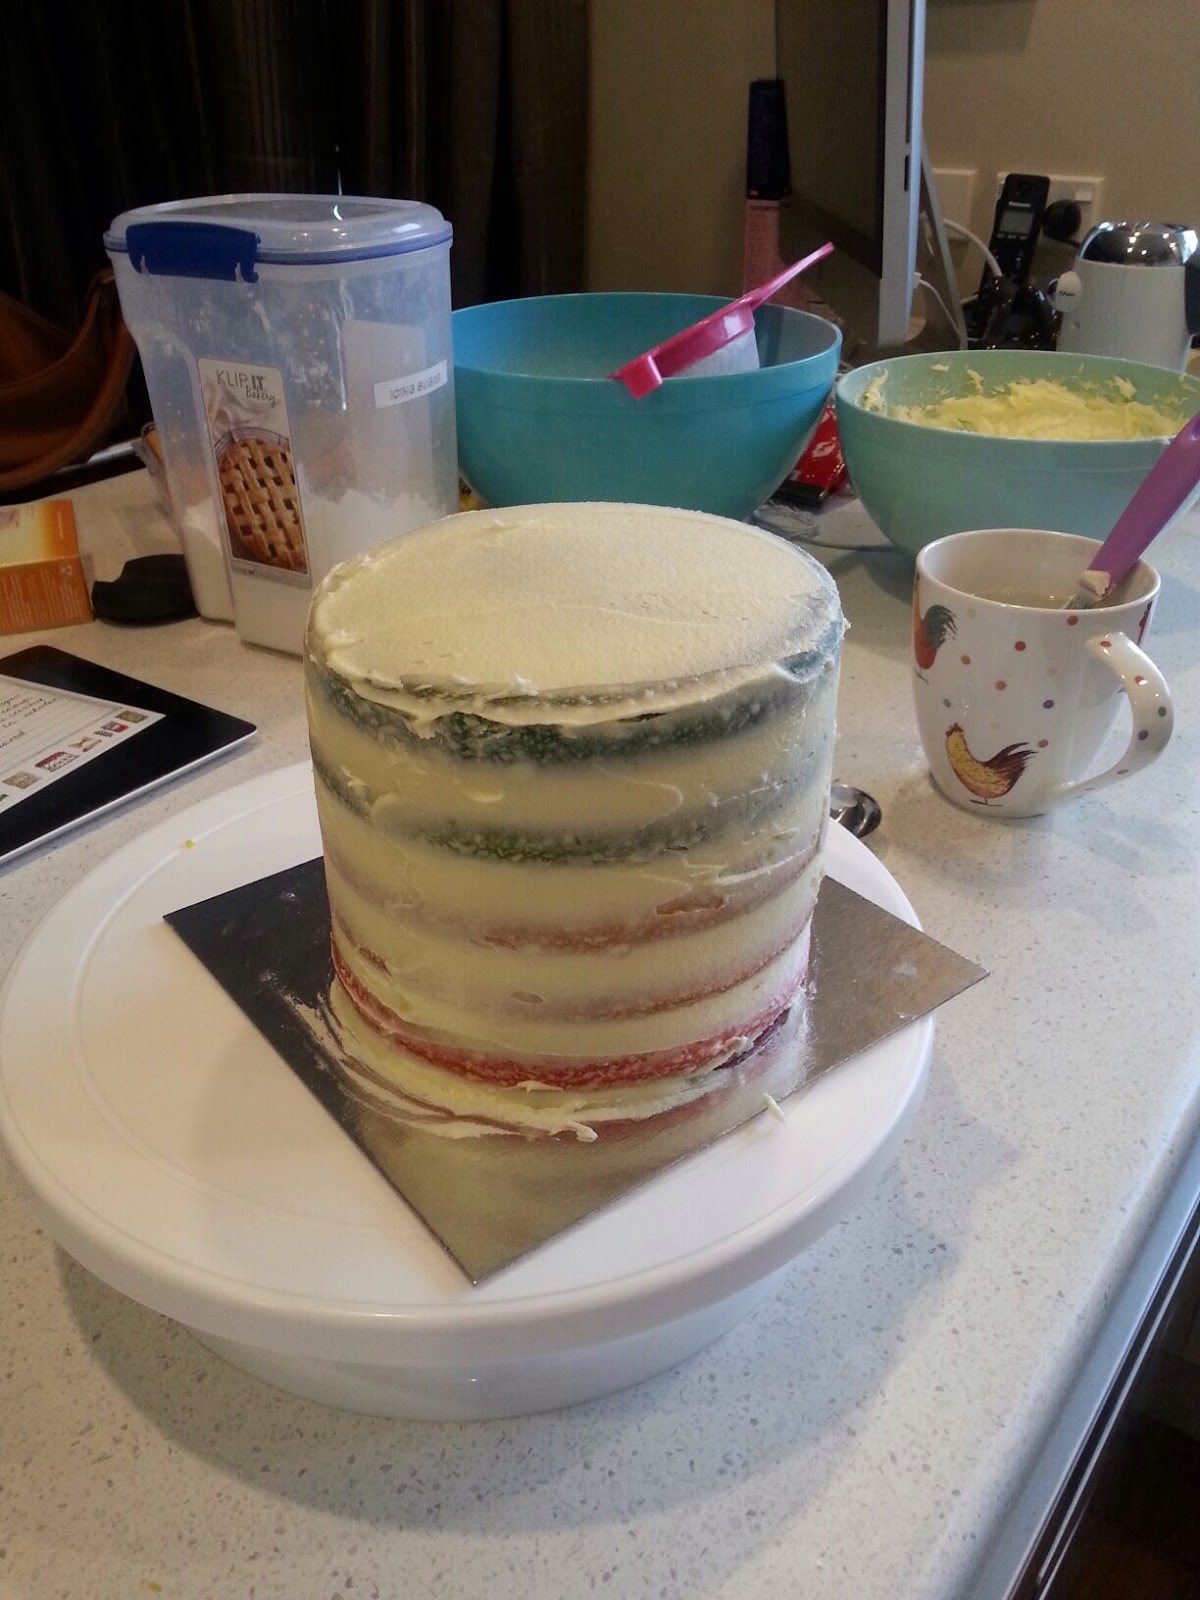
Crunch time! The crumb coating is set and now its time to get my Ombre on.
With my Piping bags "That I prepared earlier" I piped horizontal lines starting from the base, I didn't bother using tips for the 3 lighter colours and only used one on the deepest lavender because I had to have it set up for the roses. I did 4 lines of the darkest purple and slowly making my way up the cake with the other colours, for 2 and 3 I only piped 3 lines each as they were so similar in colour and then with the final and lightest of icing I just piped right up to the top. Now comes the fun part, with my heated spatula I just smoothed it out and instantly I could see the Ombre effect and I loved it!!! Was much easier than I had expected, the one thing I noted for next time is don't work it too much as is can blend the colours and you lose the Ombre, as what happen with the back of my cake, luckily it was the back aye. Then my dollop of white icing from the first batch went on top and I just had to spread this out. Lastly it was time to add the roses, years ago I had a special pair of "scissors" to remove butter cream rose and I think last year, thinking I would never use hem I threw them out so need to add this on my purchase list, bot this list is getting long, anyhow I just used a clean pair of craft scissors. I did have a wee bit of trouble getting the roses off the scissors didn't quite come off like in the video, but I just used the side of one of the nails and had no problem there.


Ta Da!


I am really stoked with how it turned out, might even be one of my favourite cakes. Hubby was obviously impressed he got a shock when he saw it in the fridge and said "wow that looks great doesn't it" This means he really likes it normally I have to ask him so that was a bit of a boost! Now that he was home I could cut into the cake and see how the inside turned out.


Yay even happier!

Ombre Take One - Success Story!


Monday 8 June 2015

Rarity- My little pony Happy 3rd Birthday Lily

My niece was going to be down here for her 3rd birthday (While visiting Nana and Grandad with the rest of her family) and her new love besides the ever popular "Frozen" is "My Little Pony" and a horse/unicorn called "Rarity"? I dunno it's all new to me. Any how I knew that the cake was all organised thanks to Grandad the fabulous pastry chef  but I wanted to make her a wee "Rarity" cake topper, I of course haven't watched "My Little Pony" since the eighties so I had to do a bit of research and let me tell you it has most definitely changed since then. This time around Pinterest didn't have much to offer so it was just down Google and Youtube.


I found a polymer clay tutorial here on Youtube which was very helpful, although I was making my "Rarity" quite a bit bigger and out of fondant rather than the polymer clay, so I came across a couple of issues. Mainly when it came to the mane and tail as polymer clay is lighter  and also has a wee bounce to it and fondant is almost a complete opposite so I had to improvise but I am pretty happy with how she came out. 


I also made a few butterflies to add to her cake and her cut out her name as well.


We all know how honest children can be so I was a wee bit nervous when I went around to the party and was trying to hide "Her" from the kids but my clever little Nephew was the first to see her and was like "Oooooo look a Rarity for Lily" phew I guess she looks like she is meant to. First test passed.

Grandad had made a beautiful cake with delicious Italian Meringue Icing in "Rarity" colours and let me tell you it tasted amazing, and looked beautiful! We added "Rarity" to the top and she looked pretty good up there. Lily was thrilled, even though "Rarity didn't have her wings on today." First freak out, What I didn't see any bloody wings in my research!! But as Lily said "Well Rarity will just have to walk today" Double Phew she was still happy. So I was really glad.

Happy 3rd Birthday Lily! Glad you were down her so we could share in your birthday.

Checkerboard my new wilton tin - Epic Fail


I was so excited when I ordered this from The Cake Shop I had been dreaming about making this cake. What colours would I use, How would I decorate it, Fondant or buttercream. I was needless to say extremely excited when it arrived. i had no party even or anything that I could use this cake for but I couldn't wait any longer for an occasion to arise. So I unpacked it and read the instructions.


Its comes with 3 pans and a wee divider that you place in 1 cake pan at a time and pour in the colours one at a time and each cake pan you change the colours around so each colour has been poured in the outer circle, middle and inner circle. Key word in the instructions "POUR" remember this word.


I made up 3 batches of cake batter a new recipe I had never tried better and pan by pan I spooned in the mixture, I had intended to pour the cake batter it but my batter was so thick pouring was not an option. When I finished with the first cake pan I went to pull out the divider this is when i knew something had gone wrong and the cake was not going to work the cake batter pulled up with the divider and this meant that the colours weren't where they were supposed to be but I was hopeful the it would work. Here is what it looked like. not the 3 extra pans at the back the instructions called for 3 batches of cake batter but I found with my recipe I had quite a bit left over so I put them into my Wilton Easy Layers pans to make another cake.


As you can see they weren't in perfect circles anymore.


This is what they looked like after they had baked and been dethroned  (Had the crown cut off)

I out them aside to cool, once cool I stacked them up with Buttercream between the layers, and for the first time I piped a "dam" on each layer which is just an outline around the inner circumference, then you fill it in with buttercream this prevents the buttercream oozing out and therefore keeps the layers even, a trick I learnt fro watching Cake Boss. While they were cooling I had decided on plain buttercream and that I would try out some different piping tips. I set aside 3 small amounts on butter cream to colour later.


Then I crumb coated and put in the fridge to set, by this cake I am getting much better at crumb coating which I am glad as this is such an important stage.


Once the crumb coat had set I was ready for the outer layer of buttercream. This went on quite well as the crumb coating was nicely set. I then used my 5" Spatula and pressed down lightly on cake while I spun my turn table to create an effect in the icing. I did the same on the top as well. I piped a border on the bottom of the cake just using a round tip. Then with the 3 bowls of buttercream I set aside earlier and I coloured them with the same colours I used for the cake batters and filled up 3 different piping bags with 3 different tips. Then in horizontal lines I piped small spots in each colour and on the top as well in one circle. My horizontal lines weren't quite level, I still need to buy a cake marker to help out with this.

This was the end result.


Then it was time to cut into the cake and see if it worked.


Whoops not quite what I expected. Hello Epic Fail, but to be fair I had suspected this was going to happen, but it's all a learning experience so I don't mind, next time I know I need to have a thinner batter. I am excited to try it again!


Want a slice?


Tuesday 2 June 2015

Rainbow cake - My new Wilton Layers Tin


On my trip up to Auckland I got a Wilton Easy Layers pan from The Cake Shop and when my Nieces and Nephew came down for a visit I thought that it would be the perfect chance to use it. Of course to make it fun for he kids I decided to make the layers different colours to make a rainbow and then use the same colours to make a rainbow petal effect for the icing.


This is my pan set it's a must buy!


Firstly I made up the cake batter and divided it into 5 bowls to colour. After colouring poured into the the wee cake pans and baked, tip remember that you have divided your cake batter so it wont take as long to bake through.


After they came out I did wish I had done purple rather than red so next time I will. While they were cooling I made up buttercream frosting and again divided into batches of 6 all the colours plus white. This is where the Wilton Decorating Bag Holder really would have come in handy. I have these fantastic plastic cups the Kiwi "Longest Drink in Town" which I use to fill my piping bags a great wee trick.


Once the cakes had cooled I stacked them with the white buttercream in between the layers. Time to crumb coat, this was one of my most successful crumb coats I think the buttercream was the perfect consistency and I just had a new long spatula.


Then I put it in the fridge to set the crumb coating. The coke of can was for scale so it's just a wee cake but you wouldn't want it any bigger because there are so many layers.


For the "Petal" effect you don't really need to have a special tip I just cut a small hole in the bags. You pipe a vertical line of dots. It should look like this.


Then with either a teaspoon or small spatula (I used a spatula) you spread out the icing starting from the centre of the circle. It should look like this. 


Then in the middle of your spread you then pipe another vertical line with your next colour and repeat above with all your colours. Once you have used all your colours start again. Continue with this until you have completed the entire surface of the cake.


Next is the top of the cake. I spiralled mine slightly which just made it easier as there wasn't a start and stop on each row. So starting with your first colour 1 dot at a time.


The most exciting part is when you get to cut into it.


There are a few variations of this that you can do, I did 1 colour per vertical line making the rainbow horizontal other cakes I have seen is all your colours in the vertical line, like below, this makes the rainbow vertical. I chose to do the rainbow horizontal because of the height of my cake, if I had had 6 colours I could have done it the other way with the dots still being even. 


If really like this way of doing it as for me i see the diagonal pattern the most and I think it is really effective. This I will try next time so stay tuned.